

Syncing Your Outlook Calendar
The availability you set up within Navigate dictates students’ ability to schedule appointments with you. You have the added option to integrate your calendar with Navigate to pull in Free/Busy times from your Outlook Calendar and push appointments scheduled in Navigate to your Outlook Calendar. Please read the Syncing Your Calendar and Managing Your Availability in Navigate article to learn more.
Step 1: Once you have logged into your Navigate account (using your Username and Network password), select the Calendar icon on the left-hand side, vertical navigation bar. Fourth icon from the top.

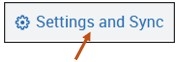
Step 2: Select the Settings and Sync button located on the right.
Step 3: Select the Setup Sync button.

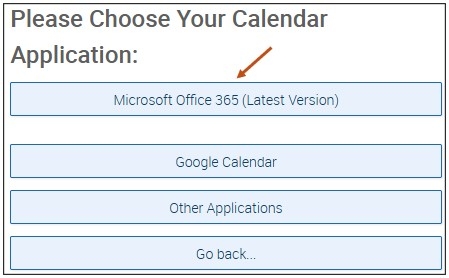
Step 4: From the provided options, please select Microsoft Office 365 (Latest Version).
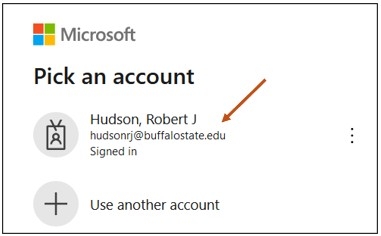
Step 5: After selecting the Microsoft Office 365 (Latest Version) button, you will be routed to login.microsoftonline.com. If you are not already signed into Office 365, you will be prompted to sign in. Select your Microsoft Outlook 365 account and follow the prompts.
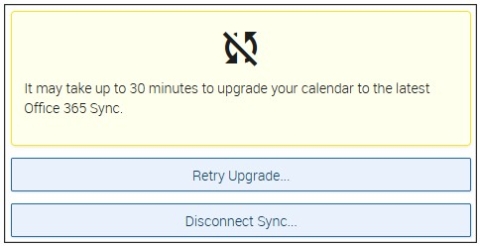
Step 6: Your Microsoft Outlook 365 account is now synced to your Navigate account. It may take up to 30 minutes to upgrade your calendar to the latest Office 365 Sync.
Please Note: In the lower right corner of your computer screen, you will see the following calendar sync success message.

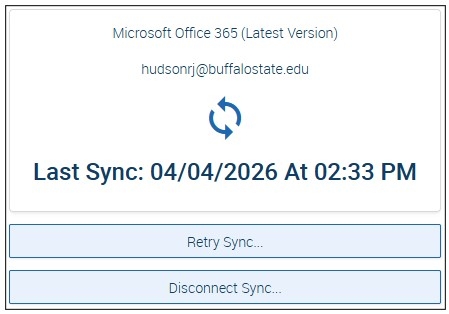
Now, if you select your Settings and Sync button, the Calendar Settings screen will show the timestamp for the last successful sync or any applicable error message. You will also have the option to do the following:
- Retry Sync.
- Disconnect Sync.
The Two-Way Sync will enable that any agenda item created from Navigate will sync back to your Outlook Calendar. All existing events and events that are created from your Outlook Calendar will be shown as ‘Busy’ in Navigate.