

Setting up Your Availability
The availability you create within Navigate dictates students’ ability to schedule appointments with you. To lean more about how to create your availability in Navigate, please read the availability article.
Steps to create your availability.
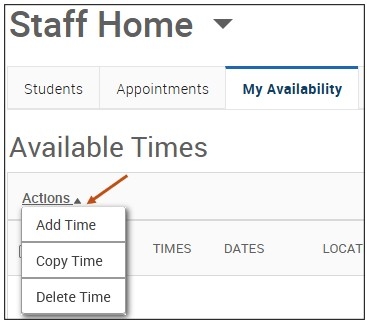
Step 1: From your Staff Home page, My Availability tab, please select the Add Time button from the Actions menu.
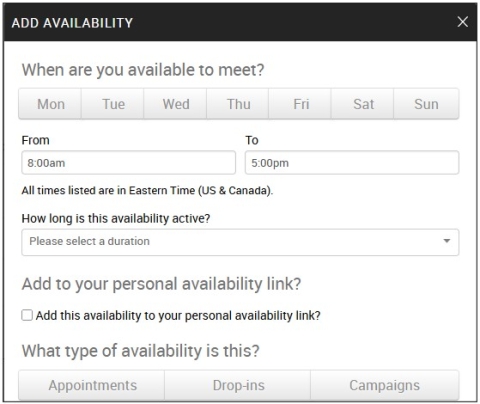
Step 2: Days and times. Select the days as well as start and end time in the From and To fields. If you have availability on the same day in the AM and PM, you would create 2 different availabilities. One for the AM and one for the PM.
Step 3: How Long is this availability active? Select from a drop-down menu the length of time of your availability. For example, a semester, a specific range of dates, or no end date (forever). It is best practice NOT to use the forever option.
Step 4: If you want your availability to include your Personal Availability Link, select Add This Availability to Your Personal Availability Link? You can put the Personal Availability Link (PAL) in an email, text message, or on a website. Students are taken to a scheduling workflow that has the staff/faculty’s chosen availabilities pre-filled.
- Personal Availability Links (PAL) are a useful tool for scheduling. Each PAL is unique to a staff member in Navigate. The link does not change over time. When you include a PAL in a URL field, website, email, or SMS (Text Message) and students select the link, they are taken to the New Appointment page in student scheduling. Buffalo State University uses Navigate Student, therefore, the link redirects to the scheduling page in the student’s browser and asks if they want to continue in the browser or open the Navigate Student app. All students should download the Navigate app right from their phone.
Please Note: The Personality Availability Link only works for regular Appointments, not for Drop-in’s and Campaigns.
Step 5: Select What type of availability is this? For example, whether you will meet students via appointments and/or drop-ins during that time.
- Appointments - availability for students to schedule appointments with you.
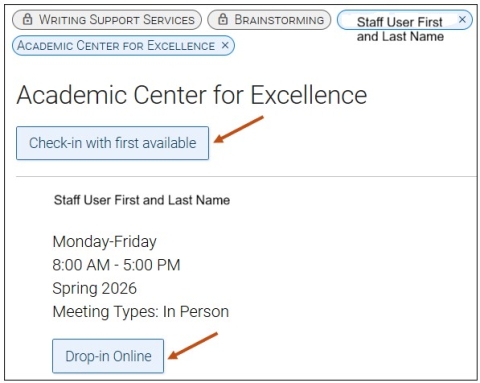
- Drop-ins - defined hours you are available for walk-in services. For most locations, students will be able to log their drop-ins via signing into their Navigate360 student app or a kiosk, If a kiosk is applicable in your area. Please Note: if you choose to create both Drop-in (Walk-in) availability and Scheduled availability, we recommend the following:
- Creating two separate availability blocks. Create one availability block for scheduled appointments (For example, Tuesday 9 AM–12 PM) and a second availability block for Drop-ins (For example, Tuesday 1 PM–3 PM). This keeps your calendar organized and clarifies to students whether they are booking a scheduled appointment or walking in (Dropping-in).
Please Note: For most locations, students can check in virtually either through their Navigate mobile app or a designated kiosk, if a kiosk is available in your area. If a student chooses either Drop-in Online with a specific staff member or Check-in with First Available, they will be checked in and see a success message with more information.
- Campaigns - Appointment Campaigns enable the advisor to request that specific students select a specific date and time within a specified period to schedule an appointment instead of the advisor creating appointments for each and every student.
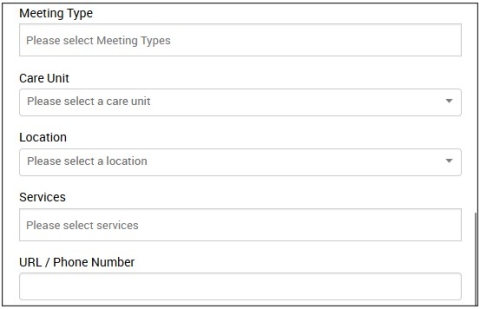
Step 6: Meeting Type. Allows you to define whether this availability is for In Person, Phone, or Virtual. Users can select both options, if needed. If setting virtual appointment availability, please be sure to add your Microsoft Teams or Zoom link in the URL/Phone Number field.
Step 7: Select from a drop-down menu, the Care Unit that your availability is related to. For example, Academic Advising or Faculty Office Hours. Depending on your role(s) with the institution, you may need to create multiple availabilities and use both the Academic Advising and Faculty Office Hours Care Units.
Please Note: If you are teaching a course(s), you will want to select the following:
- Faculty Office Hours Care Unit.
- Instructor's Office Location.
- Course(s) you are teaching.

Step 8: Select from a drop-down menu, the Location where appointments are taking place. For the purposes of Navigate, a Location is not considered a physical office space and room number.
Step 9: Select all the Service(s) (Appointment Reasons) from the drop-down list that you are offering students.
Please Note: Services are tied to specific Care Units. When scheduling your availability, you will see all the Services available for the Care Unit(s) you select. However, some Services are Student Facing, and some Services are Staff Facing. Students will only see Student Facing Services from their drop-down menu when they schedule appointments.
Some examples of Staff Facing Services are:
- Academic Advising - Advisement PIN.
- Counseling - Academic Concern.
- Other - Discussed Various Campus Resources.
A dash (–) before the Service indicates that the Service is Staff Facing. The Staff Facing Services act as SpeedNotes (Topics of discussion during your meeting) that you can select when completing your Appointment Summary Reports.
Step 10: You have the option to add a URL or phone number, which is visible to the student when they schedule an appointment. We recommend that you add your Microsoft Teams link or Zoom link in this section and list your phone number in the Special Instructions for Student section.
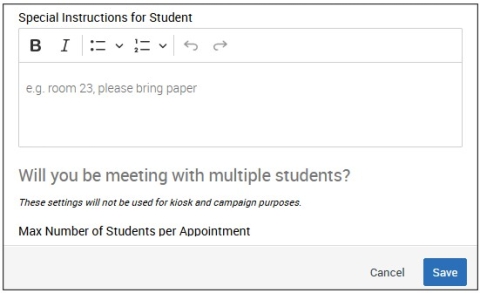
Step 11: The Special Instructions for Student text box includes any additional information that you would like the student to know prior to the meeting. We recommend that you also add your Microsoft Teams link or Zoom link in this section and list your phone number. Listing your Microsoft Teams link or Zoom link in two places will help students find it on their Appointment Confirmation email they receive.
Some examples of special instructions:
- Specific details about where you are located on campus. Office building name and room number.
- Any completed forms, documents, or other materials the student should bring to the meeting.
- We will use Microsoft Teams for our meeting, which you can access by using the link provided. Virtual meeting spaces allow us the flexibility to connect from various spaces. Please ensure the space you are in is conducive for such a meeting. I very much look forward to meeting with you!
Step 12: If needed, the number of students that can schedule during the available time can be updated. The default is set to 1. Please do not change this unless you are providing group appointments.
Step 13: Remember to click the Save button.
Drop-In Availabilities are Available at the Following Care Units & Locations
Please Note: if you choose to create both Drop-in (Walk-in) availability and Scheduled availability, we recommend the following:
- Creating two separate availability blocks. Creating one availability block for scheduled appointments (For example, Tuesday 9 AM–12 PM) and creating a second availability block for Drop-ins (For example, Tuesday 1 PM–3 PM). This keeps your calendar organized and clarifies to students whether they are booking a scheduled appointment or walking in (Dropping-in).
| Care Unit | Location | Who Can Schedule an Appointment? |
| Academic Advising | Academic Advising Center-Butler Library | All students |
| Academic Advising | Roar to Success-Bengal Success Center | Only Roar to Success Students |
| Accessibility Services | Student Accessibility Services | All students |
| Athletics | Houston Gym | Only students participating in a Buffalo State University sport |
| Faculty Office Hours | Instructor's Office | Only students registered to take your course(s) |
| General Subject Support Services | Academic Center for Excellence | All students |
| Math Support Services | Academic Center for Excellence | All students |
| Writing Support Services | Academic Center for Excellence | All students |
| Residence Life | Complex Director's Office | All students |
| Residence Life | Residence Life - Bengal Hall | Only students living in Bengal Hall |
| Residence Life | Residence Life - Bishop Hall | Only students living in Bishop Hall |
| Residence Life | Residence Life - Moore Complex | Only students living in Moore Complex |
| Residence Life | Residence Life - Neumann Hall | Only students living in Neumann Hall |
| Residence Life | Residence Life - Tower 1 | Only students living in Tower 1 |
| Residence Life | Residence Life - Tower 3 | Only students living in Tower 3 |
| Residence Life | Residence Life - Tower 4 | Only students living in Tower 4 |
| Residence Life | Residence Life – Student Apartment Complex | Only students living in Student Apartment Complex |